|
Peer evaluator: Janna :) Comments: Good points:
Things that can be improved: Stitch the cat decoration first before sewing the bag together so the thread is not seen on the inner side of the bag. Self evaluation of the bag: 3 takeaways: 1. I learnt that seemingly useless cloth that can only be thrown away can be recycled and re-sewn into something useful like a bag :) You can even add your own style by cutting it into your preferred shape and adding your own decorations. As long as you are patient and persevere in spite of challenges. you will be able to do it. 2. Being careful during selection of materials is very important. For example, if the material is too flimsy, then it may crumple up easily, making sewing difficult as you have to keep ironing it. The purpose and use of the material must suit your needs because different bags will use different materials. It is also better if it is easy to sew on. I chose cotton, as it is easy to sew on and it is very durable. 3. Sometimes I have to modify my plans so that I can continue with the rest of the bag. Originally, I had planned on a patch pocket but as I stitched the outer layer on the wrong side, I had to do a panel pocket instead. Success in the coursework: I completed a bag on my own for the first time :) and now I know how to sew bags on my own. What is one area you want to improve on: Throughout the course, I struggled with controlling my stitches such that they would be even and straight. Hand-stitching was especially difficult since I had to coordinate my hand and prevent it from shaking. One way I could improve this is by using guidelines so my stitches will be consistent. Another way is by practising my sewing more often. Achievements in terms of manipulative skills: I learnt to... 1.Thread a sewing machine 2. Wind a bobbin 3. Sew lines, curves, hems, seams and decorative stitches on the sewing machine 4. How to reinforce stitches 5. Hand sew buttons 6. Configure the sewing machine and operate the levers and buttons on it 7. Stitch a panel pocket Overall, this course has been challenging but very interesting for me because I have never sewn anything before by myself :) It has taught me to be resilient when I make mistakes and have to unpick, unpick and unpick. However, I believe the various skills I learnt will come in useful in the future :)
0 Comments
 Week 8 Evaluation What I achieved today: 1. Hand-stitched a cat on the panel pocket and main body of my bag. Challenges I faced: 1. Having to control my hand from sewing at the wrong position. 2. Drawing the cat freehand on the bag because my lines were somewhat crooked, making the guidelines unclear and stitching difficult. How well I followed my plan: I completed my bag within 7 lessons, which means I finished it before the deadline I set :)  The completed bag:)
It is meant to be carried on one shoulder and you can put files, bottles and pencil cases in it. I think that it has sufficient space for many of my violin books and can fit other things like pencils and loose scores too :D I am glad I chose this green as the lime green shade is quite mild and not overly garish.  Week 7 (Lesson 6) Weekly Reflection
What I achieved today: 1. Sewed the panel pocket, lining, straps and main body of bag together :) 2. Made a pinch base by pinching the corners and stitching it horizontally. Challenges I faced: 1. Aligning the two layers to form a pinch base so that the layers will not be separated when hemmed. 2. Keeping my stitches straight when sewing. How well I followed my plan: 1. I managed to finish everything I planned :) which means I am on schedule. 2. Also, I finished assembling everything which was work I did not finish last lesson. Things I would improve next lesson: 1. Cut off the raw edges as I sew so that the excess fabric won't misguide me and cause me to sew on it instead of the actual fabric I am using. 2. Poke out the corners of the bag when stitching so that the bag will be properly aligned otherwise it will be crooked.  Week 5 weekly reflections What I achieved today: 1. Re-hemmed the top of the bag as it was untidy and had raw edges. 2. Finished stitching the straps using the "folding" method. Challenges I faced: 1. I found it hard to keep my stitches straight when sewing the strap because I had no guideline to follow so I found it harder to guide my stitches. 2. I had to unpick the original hem of my bag, which was quite hard as the stitches were closely and tightly sewn. How well I followed my plan: 1. Slightly behind on the bag as I did not manage to assemble and sew everything together today, however I will work faster next lesson to make sure I can complete my bag on time. 2. Fortunately, I did manage to finish hemming the bag and now it looks tidier than before :) How would you improve for the next lesson: 1. Use tailor's chalk to draw guidelines that I can follow when I sew so that my stitches won't be crooked.  Week 4 Weekly Reflection Here are the things I achieved today: 1. Cut out my fabric for the main body of my bag and my straps 2. Machine stitch the bottom and sides for the lining. Machine stitch the bottom, side and panel pocket onto the main body of the bag. Challenges I faced: 1. Originally I did not want to carry out my original plan of making the entire bag double layer due to time constraints, I decided to stick with it in the end as my straps and pocket will be double layered and the bag may break under all the weight. I am now quite glad I carried out my original plan as I think it will be beautiful with a decorative inner layer. 2. I forgot to sew on my panel pocket before sealing up the edges and ended having to unpick :/ then restitch. How well I followed my plan: I think I followed it quite well because I because I managed to do the panel pocket and double layers. But I think I am slightly behind since I have not started on my straps and I still have to decorate my bag. How I would improve: I will finish the decorations (embroidery) at home so I can finish the pinched base and the straps next week. Hopefully I will be able to finish :) Also I should follow instructions better so I don't have to unpick and waste time :P   This week, I made a simple prototype of my bag.
I learnt how to hem and make a strap. I also learnt how important it is to pin the fabric down if I don't want flying pieces of fabric when I sew ._. It was different from what I had in mind. It does not have decorations, a second lining, a zip, a base and the proportion is different from what i had imagined. I will change the dimensions to 35cm by 35cm, taking into consideration all the allowances I have to make.
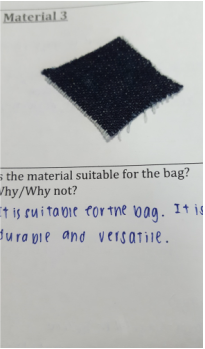
COURSEWORK TASK Make a bag out of recycled materials and decorate it to make it aesthetically pleasing INVESTIGATION Materials that can be recycled into a bag: felt, curtains, bedsheets, bags, clothes, towels, ribbons, lace, handkerchief, dishcloth PROBLEM I don't have a bag for my violin books. I need a bag to put my violin books to prevent me from dropping them especially in public where it will inconvenience other people. RESEARCH Here are some websites from my research: www.hgtv.com/design/make-and-celebrate/handmade/make-an-easy-to-sew-lined-tote-bag www.thisfashionismine.com/2012/07/diy-dip-dye-illustrated-tote-bag.html https://s-media-cache-ak0.pinimg.com/236x/42/4d/8f/424d8f727b0fda8fdc53a1138ebdc6d6.jpg FORMULATION OF DESIGN SPECIFICATIONS User of the bag: Me What is the bag to used for and for what occasion: Music scores and music class How big will the bag be: Slightly larger than A4 so that there will be sufficient space for books of all sizes What shape will the bag be: Rectangular with a base How is the bag to be carried: Handle that is long but not so long that the bag can be carried as a sling bag. 50cm Choice of material will the bag be: Cotton and other durable materials so that my scores don't get crumpled How many compartments should the bag have: 2 to 3 Fasteners: Zips Decorations: Embroidered designs like a cat with paws on the front pocket. Dimensions of the bag: 35cm by 35cm Style of bag: Tote bag/book bag
REASONS WHY I LIKE THE BAGS ABOVE
Bag on the left: The bag is reversible and has a base Bag on the right: It has a pocket in the front and the cat design is cute ^.^ FEATURES I WOULD LIKE TO INCLUDE AFTER SEEING THE ENTRIES ABOVE: pockets, double layer and a base. I think the double layer and base will make the bag more sturdy and less likely to break under the weight of books. The pockets will help me organise the things in my bag :) |
Archives
September 2016
Categories |


 RSS Feed
